Showing posts with label diy. Show all posts

Strawberry Shortcake


I am a Jason's deli strawberry short cake addict. I CANNOT go eat at Jason's without ordering one... I just can't.
Strawberry shortcake is super simple to make and I'm not talking that store bought angel food cake with strawberry goo that gets smothered on top. I'm talking dense yellow cake layered with homemade whipping cream and fresh strawberries. 

Strawberries were on sale at the grocery store this evening so I thought what better excuse to indulge in a few extra calories this evening! 

My family LOVES strawberries so this dessert gets a 5 star recommendation from the littles. Did I mention its pretty cheap to make! Total cost is around $8 and feeds 8-10 people depending on serving size. 

Free Cut Files For Fall Themed Coffee Mug


My silhouette purchase has been the best thing since sliced bread....FOOOOrrr Reall!!!! I've had it for several months now but lately I have been using it daily for all sorts of cute customized projects.

Now I scour the house looking for things that need personalizing lol!


Yesterday's Pumpkin Spice Coffee Syrup called for a special project. After picking the kids up from school me and the gang rolled to the closest dollar tree to find the perfect mug to serve the perfect fall beverage in.


We succeeded... gosh I love me a dollar tree!!!

Back to School!!!

Back to school time is near and I don't know about you  but this momma is doing a little dance!! I love my children don't get me wrong but I now work from home and having three crazy kiddos means I can't get anything accomplished...EVER!! With summer coming to an end all I can dream about is schedules, strict routines, and early bed times.

If you're like me and so ready for school to start, you will love these cute back to school diy projects!!!


I love customizing school supplies!!! Sometimes you get lucky and find super cute things and other times you stuck with blahhhhhh everybody has it supplies!!!

Check out this adorable water colored binder covers.


Front Door Inspiration


Updating and keeping up with your house can be a task! We purchased our first home 5 years ago as a foreclosure and did a ton of remodeling. Since we moved in we haven't done much else to the place ... those days of remodeling were very trying and the thought of having to fix something up was a thought we pushed far into the back of our minds and lowered to the bottom of our priority list the day we moved in.


5 Fabulous DIY New Year's Eve Party Hats!

I love an excuse for a good party. If I had an endless bank account and overwhelming amounts of free time, I would throw a party for every occasion...especially New Year's Eve!!  Party hats are a must and these 5 diy New Year's Eve party hats are too adorable to pass up. Enjoy these cute festive accessories!

Crib Mattress To Memo Board


 I've had Miss K's old mattress spring stored in her closet for probably about a year now and finally decided to get it out. I was over wrestling with it every time I had to get something out of her closet. If I was going to turn her cheapo mattress into something fabulous the time was now. 

10 DIY Advent Calendars

Christmas is such a special time for me and my family. 
Having young children really makes the holidays so much more fun. Growing up the ladies in my family were really good at making each and every holiday super special for us kids. One thing I can remember is my Advent Calendar my Oma got us every year filled with German                                                                                                                              Chocolates! 

Mine this year was filled with candy, nic nacs, small toys, movies, and activities. Sometimes things are tight during the holidays so don't over think or over spend on your advent calendar. Special activities or a few pieces of chocolate is just as exciting. Your children will cherish these memories forever!


Here are some unique and pretty advent calendars I've come across. 


I love the idea of using boxes! 


Are these boxes not the cutest?!?!?!?


This is one of my favvvvorites....


I hope you enjoyed these!!

xoxoxox
-Ann


Old Door To Table


I made the perfect sized table for little princesses... it was a table worthy of a feast indeed! I love old doors you can do so many different things with them... so I might hoard doors! But they sure came in handy during the preparations for Miss K's tea party!


Hand-painted Princess Signs

I made a cute dress-up wardrobe out of an old book case  for Miss K's princess tea party! { Check out the full tutorial at 
Gingerly Made on the 18th... I think that's my date anyways lol}

 But anywhos... I didn't need the shelves so I re-purposed them into cute signs with princess sayings. I displayed them around the tea party and eventually will hang them up in Miss K's room!


DIY Tissue Paper Garland

I came across the cutest garland on Etsy hours before the big event... I had to have it but ordering was out of the question! I decided to attempt to do it myself!! This project was super simple and cost under $5!! I initially wanted to added different colors... but I decided to use what I had on hand! 

Easy DIY Paper Doily Banner


Sunday is quickly approaching, so I'm scrambling to make sure I get all the cute little details finished!! I have a vision and really want to see it through! I'm pretty sure I've been to Hobby Lobby or Home Depo everyday for the past few weeks grabbing supplies I forgot the previous 7 trips before!!
I have so many projects I want to share... but I don't want to ruin the surprise!! Here is a sneak peek of one of the cute banners I made!

Flea Market To Fab: Rustic Coffee Table

What a day!! I've been working hard on updating my blog layout.. Have you noticed?? Thoughts, comments, suggestions?!?! People who don't think blogging is a full time job have no clue!! Phew...  but on to today's post!!!

I found this really cool trunk thing.... I have no clue what it was used for previously... but I turned it into a fabulous coffee table!! This piece is truly unique and has soo much character. I love this piece!!! {that's my problem I love everything I make... and I can't keep it all} I rearranged my entire house probably a billion times in my head trying to figure out away to squeeze it in, but it's not happening!! Even my husband was sad to see it go!

DIY Wicked Wine Bottles


   These bottles turned out sooooo cute!!! They would make perfect gifts for neighbors,co-workers, friends, and family!! These wicked wine bottles would also be a fabulous hostess gift if you are attending a Halloween party this season!! Once the adult beverage is consumed you're left with a gorgeous bottle that can be reused for Halloween decor around the house!!! I'm not sure if I want to give them away though ... I really want to display them in my own house!!

Diy: Custom Price Tags

                                                                                                                           I have a new vendor in my shop and when she came in to set up.... I noticed she had the cutest custom price tags !! 

So you know me... I set out to make some of my own!! I did everything on Microsoft office word 7! It was super simple and the turn out was more       than fabulous!!

Diy: Jewelry Organizer


   So remember those shelves I used for my previous tutorial?!?! Well I decided to spice things up and see what else I could come up with! As my mind went into full gear { conveniently as I hopped into bed one evening...} I came up with this cute jewelry organizer!! 


   I don't know about you..but I'm one to accessorize!! So I'd rather find ways to organize my collection rather than clean it out or cut back...that's no fun!!


DIY: Shelf to Serving Platter


    Me and my husband always get in a spiff on who hoards the most.... I am by no means a hoarder!! I just see potential in things others might consider trash!! Now Jon on the other hand, hoards car parts to cars we don't own and maybe never will!! Pretty sure that's the definition of hoarding... But don't get me started lol... 


   Anyways, I had several of these shelves lying in the garage for what feels like centuries! They are from an old entertainment center I gutted for a previous project. I couldn't bare to throw them out, I knew they were destined for great things!                                                                                                              
                 They made the cutest serving platters!!!! 


Cute Eclectic Nothings!!!


This past weekend I went junkin at our local flea market and came home with a truck load!! I was able to luck out on these cute figurines!! When I saw the details carved into the metal I knew I had found diamonds in the rough!! 


I wiped them down good and spray painted them. Then added a few extra details!! I'm always pleasantly surprised how a fresh coat of paint can make such a big difference.


Projects on hold....

This past weekend I scored some sweet deals on some pretty sweet junk!! I'm dying to get my hands dirty and fix up the pieces I got!!! Due to my work schedule and mother nature... I haven't gotten a chance to work on anything!! Today is looking like a great day to get after some projects.. but until then here are some super cute crafts and furniture redos I've found this week!!!


It was nice chatting with Y'all!! Leave me some love below!!


xoxoxooxoxoxoxo
Ann- The Rustic RedHead


*Here's a little sneak peak of whats to come!!!*


Boutique on a BUDGET!

On a tight budget... That's when its time to get creative!!


When I first opened my shop I didn't have a ton of money set aside for displays (Lets be honest I didn't have a ton of money set aside for a boutique period) Opening The Rustic RedHead boutique was def an impulsive decision but a great decision non the less.

When I  was getting started I wasn't entirely sure how I should display things and like I said I was on a tight budget and ordering displays were expensive and so not unique!! I remember searching online for cute unique displays but there wasn't a lot of information about the subject.

So if your interested in opening a shop of your own or just not sure how to find cute, unique, cheap displays for craft booths... look no further! Here are some cute ideas I came up with that cost me little to nothing at all!!


#1 Old Doors

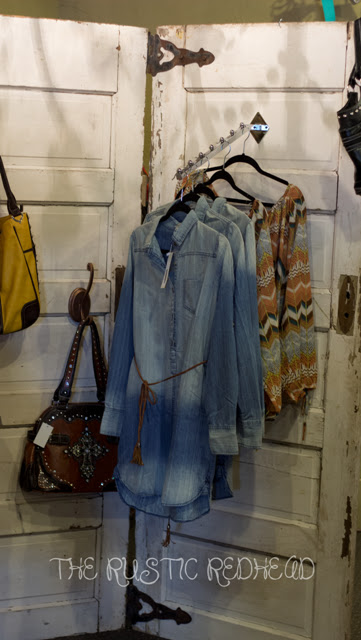
Old doors are amazing!! The options are endless you can turn them into tables, clothing racks, shelves, the list goes on!!

I scored several of these old doors for FREE. I chose to hinge them together ( I found 10 of these awesome rusty hinges at the flea market for $15) Since the old doors were real wood they were nice and sturdy and didn't need any added support to stand on their own! 

Then I ordered hooks and these clothing racks from a retail supply store for next to nothing!

I love the way these rustic old doors look under my crystal chandeliers ... which I purchased for a good price at IKEA. 


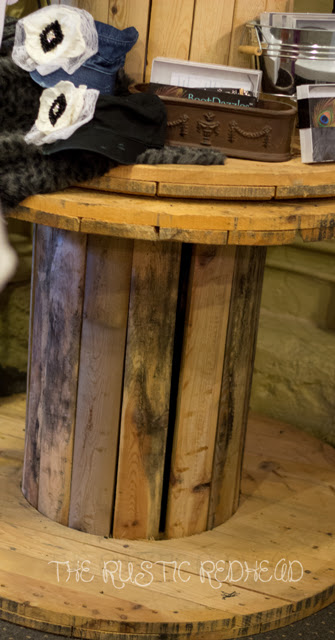
#2 Wooden Spools

I contacted my local electrical company and again SCORED these wooden spools for FREE FIFTY FREE!! 
My shop was in need of a little height so I stack two of these huge spools on top of each other. I use them to arrange cute gifts and sometimes shoes! 
I left my spools unpainted.. I think it gives my shop another element of that rustic chic feel I love( I was being lazy) But you can paint them and decorate them cute to match anything! 


#3 Pallets

If your an avid follower of diy blogs and pinterest you already know about pallets! I was lucky  to know someone who was generous enough to give me a ton of FREE pallets from their job!! If you're not so lucky head on over to craigslist! Some one is always posting free pallets!!

Again, I purchased the clothing racks from a supply store for hardly nothing... whooola cool rustic clothing display!! I have some longer ones I've painted around the shop as well!!


# 4 

Now this display gets the most attention out of all my nifty lil rinkie dink displays! I hung old chairs on the walls and used them to hang clothes! 

Four of the chairs I had acquired from the flea market 
( only 30 bucks) that came with a table ( its in the shop too) I repainted them turquoise! They were initially for my back patio set, but ended up taking just the table to my shop... then I was left with four random chairs (they eventually became my dogs chew toys :/ )

Then got wind of this cute idea!! So I took them up to my shop  chew marks and all ( its just a little added character lol) I bought some  more random chairs at the flea market... I'll also admit to picking up a few on the curb that were left for trash !! 
( free is free )


Well there you have it! Junk makes the best displays!!! 


It was nice chatting with Y'all! What did you think of my pocket friendly displays?!?! I'd love to know leave me a comment below!!


xoxoxoxoxoxo
Ann -The Rustic RedHead


Inspiration magnet boards!!!

I love hanging up quotes,pictures, or goals that I can see on a daily basis! It keeps me motivated and working hard toward my goals and cheers me up after a long day!! I had extra materials from a crafting class we had at the shop awhile back so needless to say my crafting itch came out and went a little crazy!!
These magnet boards are supppppper doooper easy!! I whipped three up last night in no time! ** sorry for the picture quality... my camera died after the first picture so had to use the cellar device : /


Supplies:
Fabric of choice
coordinating ribbon
galvanized metal board pre-cut 
hot glue gun
large needle


Start buy making two holes
I measured three inches from the each side ... marked it and using a screw driver looking tool lol ( have not earthly clue what this tool is called)..... then hammer it into the sheet of metal.
DO NOT DO THIS ON YOUR NICE TABLE IT WILL PUT A NICE HOLE IN IT!

Using this nifty unknown named tool work the hole to where it will be large enough that your needle and ribbon will easily slip through!

Be careful after you make the holes the edges are sharp! Take a  file and smooth them down if you have one!


Now, take your fabric and lay the right sound down on your working surface. Then place your board on top! Trim off extra fabric leaving a couple inches on each side.

Then fold over the extra fabric twice and hot glue it to the board so that your left with a nice clean edge.
Do the top and bottom edges first then move to the sides!
* Make sure its nice and tight... Oh and depending on the fabric pattern you choose... you might want to make sure you line up the pattern so it doesn't look crooked on the front... does that make sense?


Feed the ribbon through your needle...


Now, carefully run the needle through the holes you make earlier.... It might take some time depending on how thick your fabric is.


Tie the two pieces together on the back and cut off extra ribbon. I hot glued my knot to the board for a little added security!


AND DONE SON!!!


Now all you have to do is make some cute magnets!!


*** I'll be uploading a video tutorial next week ****


Have a blessed day thanks for stopping by!!!